Simple way to Install and Enable HTTPS SSL in Blogspot Custom Domain
Activate HTTPS On Custom Domain Blogger
Blogs that have the HTTPS protocol will look more trusted and safe for visitors. Of course this can be a plus for your blog.
By default, Google provides free HTTPS services for all blogs created under the auspices of Blogspot / Blogger. Only this service is active if the blog is still using a default subdomain, for example namadomain.blogspot.com
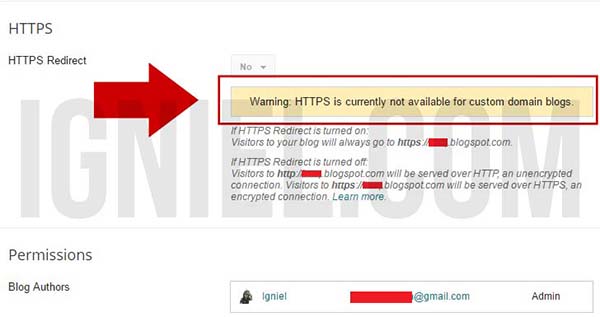
If you are already using custom domain alias TLD (Top Level Domain) like .com, .net, .id, etc., this service automatically can not be used again. This is clearly listed in the Blogspot setting itself.
How dong?
Do not worry. It turns out still can plug and activate HTTPS (SSL) in Blogspot custom domain . We will use free SSL from Cloudflare. To make it easy, I use screenshots for each of the steps.
1. Setting DNS to Cloudflare
I assume you have a Cloudflare account and custom domain settings there (CNAME and A Name). For those still setting DNS elsewhere, immediately move to Cloudflare. Why? Yes because we get SSL from Cloudflare. If you do not understand how to custom domain settings in Cloudflare, googling aja. Lots of tutorials. But the HTTPS tutorial in the custom domain Blogger has not been much. So I wrote this article: D
2. SSL settings
This is the main step here. Ikutin yes, I’ve tried to explain in detail. Do not let the actual questions appear in the article just because you are lazy to read: D
-
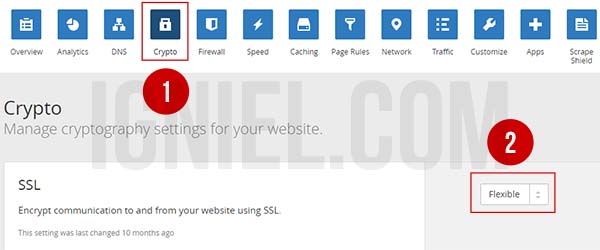
Select Crypto menu. Then select Flexible .
-
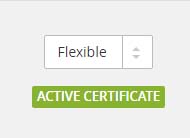
Wait up to 1x24 hours for SSL activation process. But usually a few hours doang. If you have, there will be a rich ACTIVE CERTIFICATE writing.
-
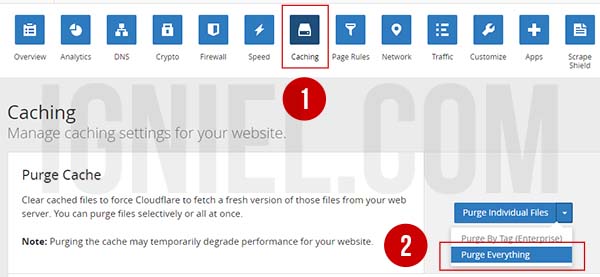
Activated? Okay, go to Caching menu. Then select Purge Everything .
-
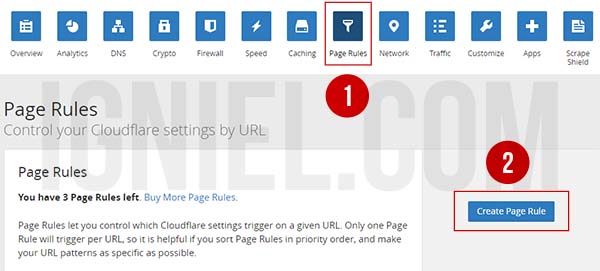
Select the Page Rules menu. Then click on Create Page Rule .
-
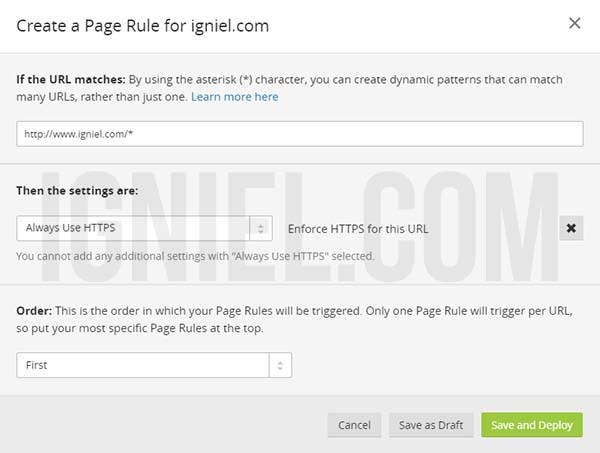
Write the full domain URL, end with the / * sign so that all URLs can be accessed via HTTPS.
Click + Add Setting , and select Always Use HTTPS . Do not forget to click Save and Deploy . -
Finally, select the Firewall menu. Then select Low .
[ in Blogspot Custom Domain - igniel.com")](https://4.bp.blogspot.com/-lO0krNJgGTo/WJR4REUTDmI/AAAAAAAAEdI/8mgWjrr8Tg879MD7NGZ1_PQKPIwOxYF1ACPcB/s1600/Cara%2BPasang%2Bdan%2BAktifkan%2BHTTPS%2B%2528SSL%2529%2Bdi%2BBlogspot%2BCustom%2BDomain%2B09.jpg "How to Install and Enable HTTPS (SSL) in Blogspot Custom Domain - igniel.com")
And finally your blog custom domain can be accessed using HTTPS. How, easy right? But wait, there are some things that must be considered from the use of this SSL.
3. Things to Look For If Using SSL on Blogspot
Mixed Content
There is the possibility of Mixed Content (mixing between HTTP and HTTPS) resulting in some images or scripts not being able to run properly. To fix this, you can change the URL of the image and the script was originally http to https.
Check the URL of Script and Image
Check the URL of the script you installed. If the URL is still http, immediately change to https.
Check each article and make sure all image URLs are changed to https. Pegel indeed. But for maximum results, why not.
Submit Repeat Sitemap to Google Webmaster
Make all blog indexes become https. For that you have to re-submit the sitemap to Google Webmaster. Do not let your blog index there are two, namely http and https. Later Google confused.
Maybe that’s what I can write. If there is a shortage and input please write in the comment field yes. Let this blog can continue introspection and growing: D

